To deploy SaaSKit smoothly, follow this precise sequence to set up your configuration variables, execute your SQL Server migrations, and trigger the automated infrastructure seeding.Documentation Index
Fetch the complete documentation index at: https://codevestllc.mintlify.app/llms.txt
Use this file to discover all available pages before exploring further.
🛠️ 1. Prerequisites
Ensure your local development environment has the following software installed: .NET 8 SDK (Latest stable release) SQL Server (LocalDB, Express, or Enterprise Edition) IDE / Code Editor of your choice with C# development tools installed⚙️ 2. Setting up appsettings.json
Navigate to your Web API root directory, open the appsettings.json file, and replace the placeholders with your own infrastructure credentials: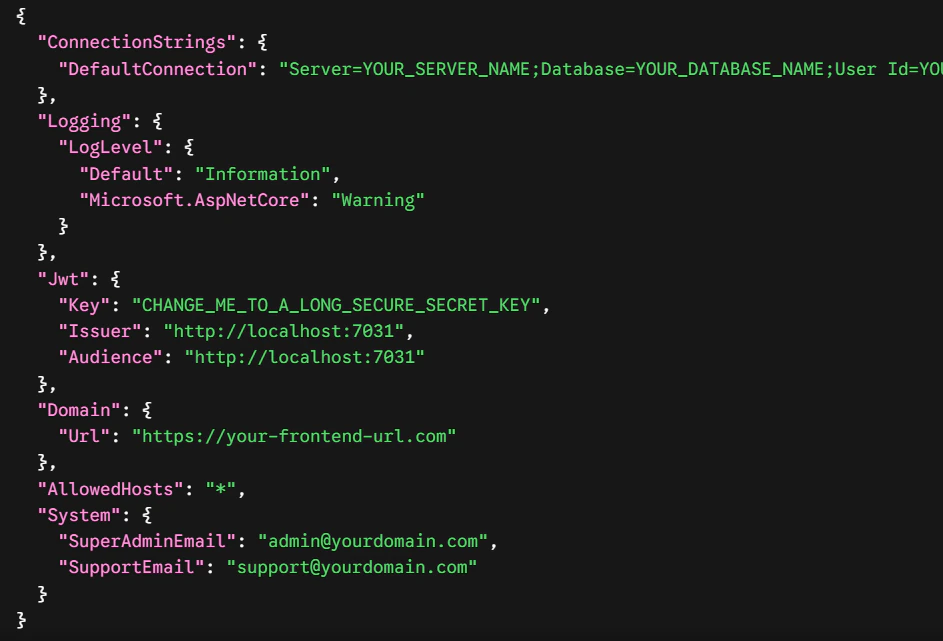
🌐 Cross-Origin Resource Sharing (CORS)
Inside Program.cs, the CORS policies dynamically evaluate incoming origin strings to securely whitelist wildcard tenant queries while sealing out malicious request injections: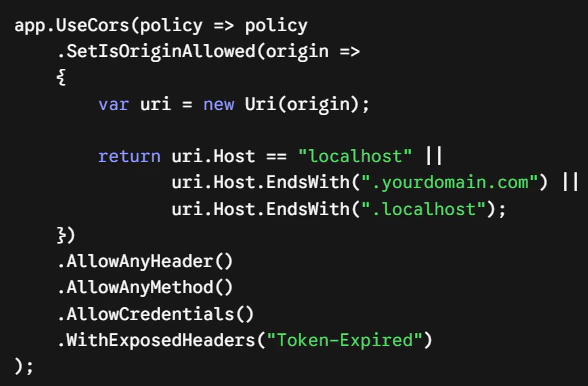
🍪 Cookie Scope Allocation & Lax Security Policy
Within the TokenService layout, the ApplyDomainAndSecureSettings engine ensures that authentication scopes seamlessly persist across custom dynamically created subdomains by modifying cookie attributes: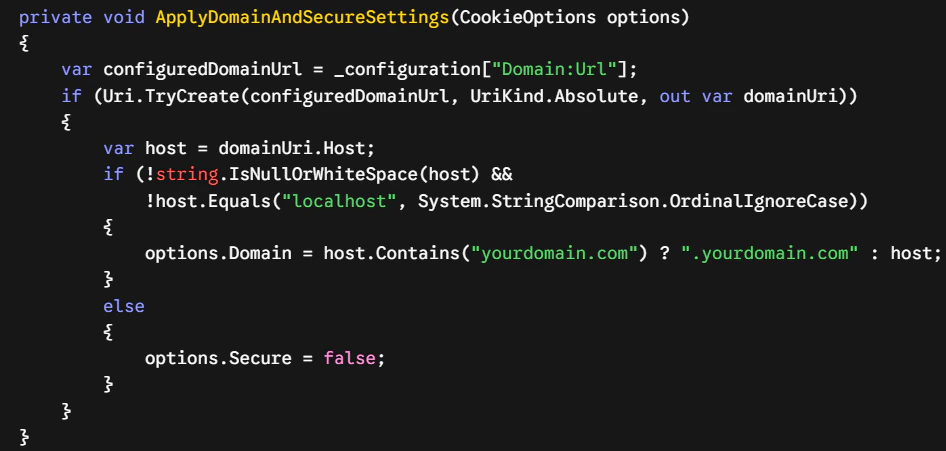
🏗️ 4. Applying Database MigrationsSaaSKit uses Entity Framework Core to orchestrate database modifications. Follow these steps to map the architectural schema directly to your target SQL Server instance:
- Open your project solution in your preferred IDE.
- Open the Package Manager Console (via Tools -> NuGet Package Manager -> Package Manager Console).
- From the Default project dropdown menu inside the console, explicitly select SaaSKit.DataAccessLayer.
- Run the following standard migration targets to map your schema and create the database:
🌱 5. Automated Data Seeding Mechanics (DbSeeder)
SaaSKit contains an integrated DbSeeder.cs workflow situated directly within the DataAccessLayer. When the web API boots for the first time, the engine checks for an empty dataset and programmatically spins up the initial application context.
🚨 IMPORTANT LOCALHOST REQUIREMENT: You MUST launch the backend application locally using the HTTPS protocol at least once (e.g., https://localhost:7031). This is strictly required for the system to execute the initial setup and successfully write the seed data into your database.
🛂 Root Identity Generation
The seeder captures your declared configuration parameters to provision your global access credentials:
Super Admin Activation: Extracts your entry from “System:SuperAdminEmail”. If none is specified, it fallbacks onto superadmin@superadmin.com.
Initial Access Password: Instantiated globally with a default temporary password of Admin123!. Change this credential immediately after logging into your admin panel dashboard.
Support Ticket Matrix: Assigns incoming customer care notifications directly to your custom set “System:SupportEmail” gateway so that all support tickets are tracked successfully.
💾 Core Seed Entities Generated
During execution, the database engine will populate the following structural system constants:
System Workspace Tenant: Configures an initial isolated baseline workspace with a hardcoded static tracking ID (00000000-0000-0000-0000-0000000000ff) and links your Super Admin account directly to it.
Global App Settings & Themes: Deploys initial layout values utilizing a primary Indigo skin (#4f46e5), Raleway typography frameworks, and defaults localized system structures (UTC, USD, yyyy-MM-dd).
SaaS Billing & Security Configurations: Toggles internal global states including default 14-day trials, standard billing switches, strict maximum sign-in limitation caps, and automatic internal system prefixing rules (INV).
Action-Based Permission Engine: Maps out critical tenant and system role operations including detailed fine-grained capability checks (subscription.upgrade, stripe.checkout.create, audit_log.read, tenant.update).
🛂 Initial Super Admin Credentials
The seeder captures your declared configuration parameters inside appsettings.json to provision your default root access profile:
Username / Email: The exact value configured in your “System:SuperAdminEmail” field (e.g., admin@yourdomain.com). If left empty, it will default to superadmin@superadmin.com.
Default Password: Instantiated globally with the default static password Admin123!.
Support Ticket Matrix: Assigns incoming customer care notifications directly to your custom set “System:SupportEmail” gateway so that all support tickets are tracked successfully.